About Us
Lofty Ideas » How to install domes and upstands
Lofty Ideas! No.5
How to install domes and upstands!
For Lofty Ideas this month, we are going to show you how to install domes and upstands.
Step by Step
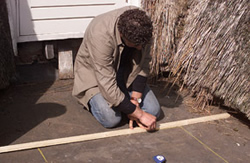
1. Drawing DimensionsDetermine the location of the dome light on the inside against the roof boarding. Drive long nails from below through the roof into the angular points of the dome light. They act as reference points on the roof. From these reference points mark off the dimensions for the hole in the roof to be sawed out. Measure both diagonal dimensions. When they are the same, you may assume that all angles are straight. |
 |
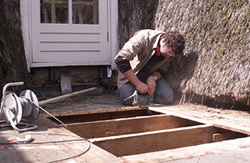
2. Supporting the roof constructionPlace girders (also called props) on both sides of the opening to be sawn out. The joist (s) that may be in the way can then be sawn out without a problem. |
 |
3. Sawing out a holeMake a cut in the roof covering with a hobby knife. Do this one centimetre outside the marked-off lines of the opening. Bore a hole to begin with, so that you can saw out the hole with a reciprocating saw over the marked-off drawing lines. For this purpose first screw a lath along the saw cut in order to avoid misalignment. |
 |
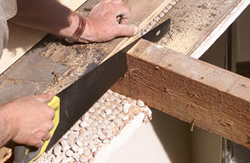
4. Sawing out a beam constructionThe joist that is in the way can be removed manually or a fretsaw. Collect the lose ends by making a so-called trimming joint. This is a cross beam that connects the existing joists, as a result of which the construction is strengthened again. |
 |
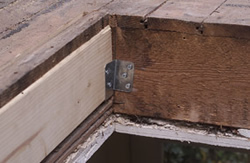
5. Applying the auxiliary constructionFirst screw the trimmer irons on the existing joists. Then the girder (trimmer joist) can be screwed on to this. The ends of the sawn-off joists must be screwed on the trimmer joist in the same way. Then place the second joist, so that a hole the size of the girder of the dome light remains. Later on the other sides of the hole can be finished with a material that you can choose yourself. |
 |
6. Applying a cement borderA cement border must be made under the vertical elevation of the dome light. Depending on the roof covering material, this is waterproof cement, a cold adhesive or hard bitumen. Apply the cement on the lower side of the vertical elevation and around the hole. |
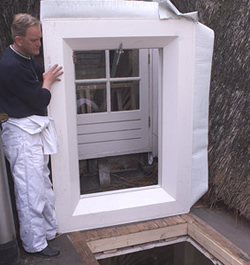 |
7. Screwing the vertical elevationThe vertical elevation can be placed over the roof opening. |
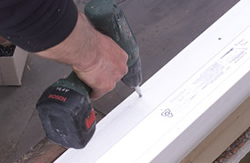 |
8. Applying the roof covering materialThis is usually done according to the instructions of the roof covering supplier, because it greatly depends on the existing roof covering material. |
 |
9. Placing the domeMount the dome light on the vertical elevation by using the supplied screws. |
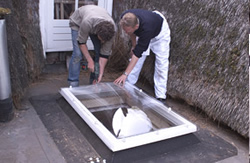 |
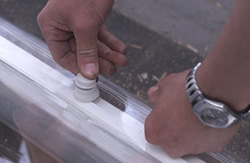
10. FinishingThen click on the SafeClick® cover cap on the screw to prevent burglary. |
 |
Tip 1 - Sustainable buildingIf the roof has been insulated according to the prevailing standard, the choice of the type of dome light must also be adapted to this. For this purpose Vaculux has a three-wall dome with a specially insulated PVC broad-flanged (completely recyclable) vertical elevation. This combination meets the most modern requirements of the National Package of Sustainable Building (Nationaal Pakket Duurzaam Bouwen). |
|
Tip 2 - SafetyCheck the Safeclick fastening system on the vertical elevation of the dome light. This will make it more burglary-proof. There are also dome light models that are made of high impact-proof polycarbonate, which will make the domes even more burglary-proof. |
|
Tip 3 – VentilationThe dome light has a ventilation option in the form of special extension systems. These are available as standard electric systems, but also with a sunlight element. |
|
Tip 4 - AccessoriesIrritating insects can be kept out with a special insect screen for ventilating dome lights. Sun protection on the inside of the vertical elevation is also possible. |
|